How to enable Virtualization Technology (VT-X) in Lenovo, idea, ThinkPad and ThinkCentre system or in any Laptop
Description
Modern CPUs include hardware virtualization features
that help accelerating VirtualBox, VMware,
Hyper-V, and other virtual machine applications.
But Intel VT-x isn’t always enabled by default.
that help accelerating VirtualBox, VMware,
Hyper-V, and other virtual machine applications.
But Intel VT-x isn’t always enabled by default.
If it isn’t, you’ll see a message like “VT-x/AMD-V hardware acceleration is not
available on your system,”“This host supports Intel VT-x, but Intel VT-x is disabled,”
or “The processor on this computer is not compatible with Hyper-V.”
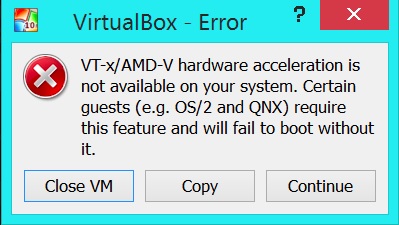
available on your system,”“This host supports Intel VT-x, but Intel VT-x is disabled,”
or “The processor on this computer is not compatible with Hyper-V.”

Applicable Brands
- ThinkPad, ThinkCentre, ThinkStation
- Idea/Lenovo laptops, ideacentre
Operating Systems
Microsoft Windows 7, 8 and 10
Solution
Enabling VT-x in ThinkPad\Thinkcenter Systems
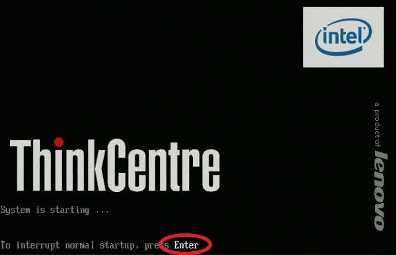
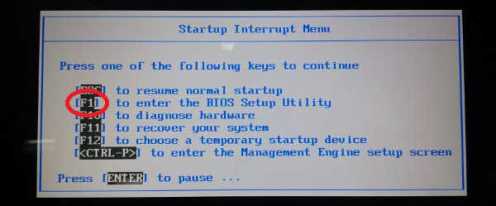
- First you will need to access your BIOS.
- Press Enter or Tap the touch screen during Lenovo start up screen.

- Press Enter or Tap the touch screen during Lenovo start up screen. For more information, go to:
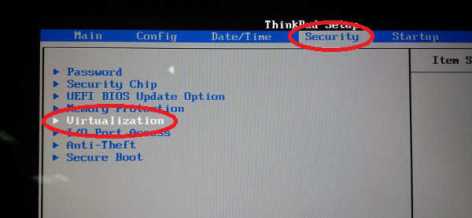
- Navigate to Security tab, then press Enter on Virtualization. ( Thinkpad )
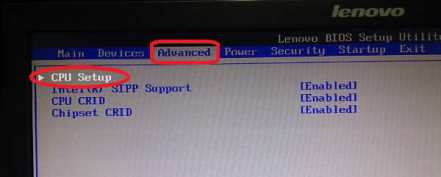
- Navigate to Advanced tab and press Enter on CPU Setup. ( Thinkcenter )
- Select Intel(R) Virtualization Technology, Press Enter, choose Enable and press Enter.
- Press F10
- Press Enter on YES to save the settings and boot into Windows;
Enabling VT-x in Lenovo\Idea Systems
- First you will need to access your BIOS
- Power off the computer. While the laptop is in power off state, press the Novo button to boot into BIOS. For more information:
- Recommended way to enter BIOS for IdeaPad, Lenovo Laptops
- Recommended way to enter BIOS for Lenovo Desktops & All-In-Ones
- Video: Enter the BIOS Setup Utility in Windows 8, 10
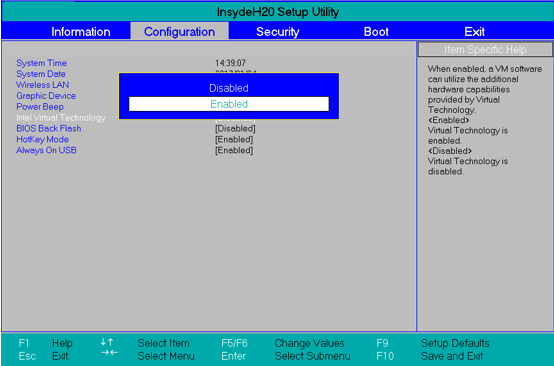
- Navigate to Configuration tab, and select Intel Virtual Technology. Switch to Enabled.
- Press F10
- Press Enter on YES to save the settings and boot into Windows
On a UEFI-based computer, you can’t necessarily just press a key while the computer is booting. Instead, you’ll need to follow these instructions to access the UEFI firmware settings from the Windows advanced startup options. Hold down the Shift key as you click Restart in Windows to reboot straight to that menu.

Whether your PC uses BIOS or UEFI, once you’re in the settings menu, you can begin looking around for an option labeled something like “Intel VT-x,” “Intel Virtualization Technology,” “Virtualization Extensions,” “Vanderpool,” or something similar.
Often, you’ll find the option under a “Processor” submenu. That submenu may be located somewhere under a “Chipset,” “Northbridge,” “Advanced Chipset Control,” or “Advanced CPU Configuration” menu.
Enable the option and then select “Save and Exit” or the equivalent feature to save your settings changes and reboot your PC.

After the PC restarts, you can try using VirtualBox or VMware again.
What to Do If You Don’t See the Intel VT-x Option in BIOS or UEFI
Unfortunately, some laptop manufacturers and motherboard manufacturers don’t include an option in their BIOS or UEFI settings for enabling Intel VT-x. If you don’t see the option, try performing a web search for the model number of your laptop—or your motherboard, if it’s a desktop PC—and “enable Intel VT-x”.
Comments
Post a Comment